Macintosh Plus Emulation

First published July 2003. 
Updated July 2012, and March 2023.

I’ll never forget being intrigued by the first Mac I ever saw.

I spent my childhood tinkering with Commodore 64’s, Amstrad CPC 464’s and the occasional Amiga. I first had regular access to IBM compatibles in 1986 and they consumed my attention for the next two years. Then in 1988 my family moved to a small town in country New South Wales, Australia, where I was upset to find there were no IBM clones at my new school! Instead there were these tiny computers labelled “Macintosh Plus”. I was surprised to see that every one of these computers had a mouse—previously the presence of a mouse had been a novelty for me. I curiously switched it on and played with the mouse while the screen displayed a flashing question mark on top of a disk. An older kid then gave me a disk. It was a little 3.5″ disk, not like the larger 5.25″ floppy disks I was familiar with (I think it was System 3). It booted, and within the next two minutes I was convinced that this was the coolest thing I had ever seen.

Nowadays there’s not a great deal of difference between the various platforms, not enough at least to make a noise about like the Mac in the eighties.

Mini vMac

The multi-platform Mini vMac emulates a Mac Plus with the use of a ROM that you extract from your old Mac Plus using a program called CopyRoms. Once the ROM has been extracted the resulting file must be named “vMac.ROM” and placed into the same directory as the Mini vMac program. Disks are then inserted into the emulated Mac Plus by dragging-and-dropping disk image files onto the Mini vMac icon or application window (of course the emulated machine won’t boot unless the disk image contains an installed system).

A screenshot showing the emulator Mini vMac running on a Linux desktop
Mini vMac running on my Linux desktop circa 2003

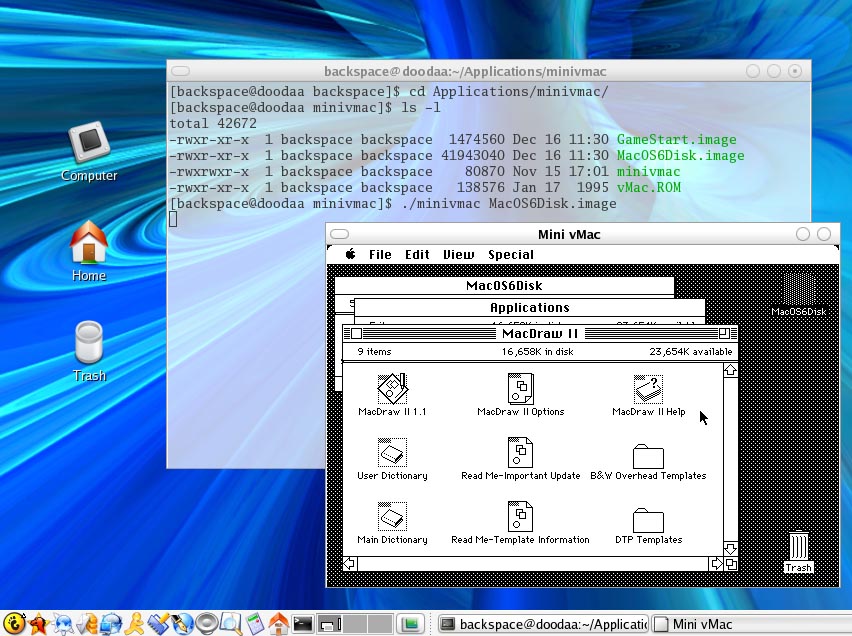
It really is incredible how well the emulator works. A nice touch is how the mouse cursor moves seamlessly in and out of the emulator window. You’ll need to use [Ctrl][M] to magnify the display, and [Ctrl][F] to enter what’s called “full screen” in order to trap the mouse cursor when playing games. My only criticism is that compared to my old Macintosh the emulator seems to have a little too much power.

There’s no longer the need to save pocket money in order to buy expensive floppies. An archive called Blanks contains a number of blank disk images of varying sizes that are of course infinitely reproducible. (The floppy drive of the Mac Plus is not emulated allowing disk images of arbitrary sizes to be used—subject to file system constraints.)

The best operating system for the Mac Plus is System 6 and luckily Apple has released this OS as freeware. Boot the emulator using the first of two disks called Z-6.0.8-System_Startup. Next drag an appropriately sized blank disk image onto the Mini vMac window and begin the system installation. If needed mount the second System 6 disk image called Z-6.0.8-System_Additions and copy any of the needed extras.

I was lucky enough that I was able to clone the external 40 MB hard drive from my old Mac using my SCSI equipped Powerbook. The resulting disk image works perfectly with Mini vMac. Using this image with the emulator feels just like I’m using my old computer.

A screenshot of Macintosh System 6 running in an emulator
Mini vMac running System 6.0.8 on macOS 13

There are two applications available to get files in and out of the emulated environment. To export a file, run ExportFl from within the emulator, then press [Cmd][O] and select the file. A save-file dialogue box will then appear in the host operating system. To import a file, run ImportFl from within the emulator, and then drag a file onto the Mini vMac icon or application window. A save-file dialogue box will then appear in the emulated environment. It is important to realise that resource forks are not preserved in either direction. The file type and creator codes can be corrected within the emulator by using ResEdit and selecting Get Info from the File menu. Within modern macOS the same is achieved by using the Finder and selecting Get Info from the File menu and setting the option Open with.

If you have lost software due to the failure of an aged floppy disk (like me—dammit!) you’ll most likely be able to replace it at the Macintosh Garden. This site is dedicated to preserving software titles that have been abandoned by their rights holders.

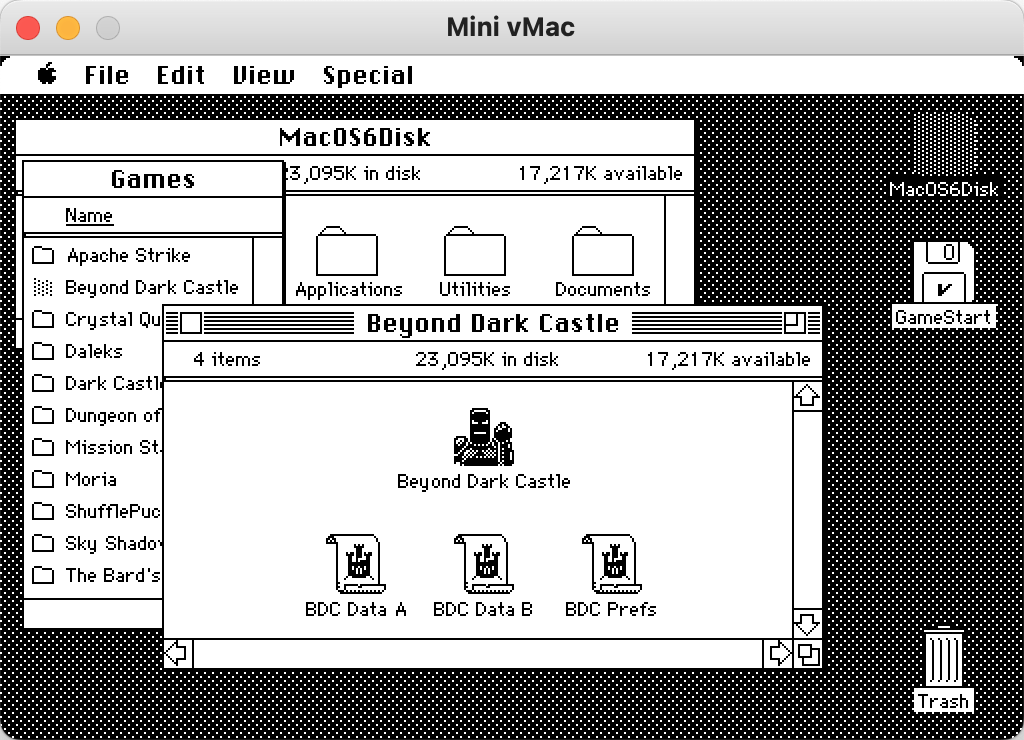
Note that you’ll need a stripped down system disk in order play most games (such as Beyond Dark Castle). Using a typical System 6 install will cause many games to fail at launch, giving an error message about a large OS occupying memory. I always booted my old Mac from a floppy when playing games, and from the hard drive when doing anything else—I use the emulator in the same way.

Lastly, for those who are fussy about the icons that appear in macOS, there are some high resolution icons for Mini vMac and its associated files available on the Mini vMac website.

If you’ve got any questions, don’t hesitate to ask.

Resources Mentioned Above
Mini vMac icon minivmac-36.04-mc64.bin.tgz (58 kB)
This is a 64-bit Intel binary for macOS. Released October 2018. (There are binaries available for many different platforms.)
vmac.rom.tar.gz (104 kB)
An image of the ROM from my Mac Plus. The uncompressed file goes in the same directory as the Mini vMac application.
Zip icon blanks-1.1.zip (53 kB)
A zip archive containing a number of blank disk images of varying sizes.
FDD icon Z-6.0.8-System_Startup.sea.bin (713 kB)
This is the first of the two disks of System 6.0.8. I have repackaged this as Z-6.0.8-System_Startup.tar.gz for use with macOS.
FDD icon Z-6.0.8-System_Additions.sea.bin (745 kB)
This is the second of the two disks of System 6.0.8. I have repackaged this as Z-6.0.8-System_Additions.tar.gz.
App icon exportfl-1.3.1.zip (64 kB)
This is used to export files from the emulated machine without the need of an intermediate disk image.
App icon importfl-1.2.2.zip (62 kB)
This is used to import files into the emulated machine.
HDD icon MacOS6Disk.image.tar.gz (12.5 MB)
This is an image of the external hard drive from my old Mac. The image is 40MB and is about half full. It successfully boots the emulator.
FDD icon GameStart.image.tar.gz (366 kB)
This is a disk image containing a minimal install of Mac OS 6.0.8. I use this to boot the emulator when playing games.
HTTP icon https://macintoshgarden.org/
A site containing many “abandonware” titles. This is a great place to replace those old games that have been lost to disk rot.

Driving.js and the Gaming Loop

The Diving Game is a JavaScript game (desktop only) that myself and my Year 9 class wrote in August of 2016. I was asked to teach ActionScript and Flash in the context of gaming. But by 2016 the demise of Flash, if not imminent, was obviously near, so I decided that JavaScript would better serve the students. (The deprecation of Flash was then announced in 2017.)

A screenshot of a simple game consisting of a top down view of a yellow block representing a car being driven along a blocky grey road amongst a green backdrop
A screenshot of driving.js in action. If you make it to 2000, you’re doing well!

I took the idea from a program written in Basic that I typed out from a computer magazine into my computer in the mid-eighties. In that program the edges of the road were exclamation points and the car was an asterisk at the bottom of the screen. In this version we have moved the car upwards from the bottom of the screen and made the game increase in difficulty by slowly increasing the speed. Some other niceties have been added, including more natural key handling (see below) and a crash animation.

Students were quite creative in their colour and shape selection when writing their own versions. Some went to great lengths to render a more realistic top-down view of a car, and some replaced the green grass with pulsating psychedelic colours.

One interesting problem we had to solve was the handling of the cursor keys. It’s not as simple as left-cursor go left, right-cursor go right. The main problem is that most people will press one key before letting go of the other. So we had to keep track of which way the car was going, as well as examining key lifts in addition to key presses.

var gameIsRunning = false;
var changeInCarPos = 0; // used for steering

document.onkeydown = checkDown;
function checkDown(e)
{
   if (e.keyCode === 37) changeInCarPos = -ANIMDELTA;       // [left] 
   else if (e.keyCode === 39) changeInCarPos = ANIMDELTA;   // [right]
   else if (e.keyCode === 83 && !gameIsRunning) // [S]
   {
      gameIsRunning = true;
      runGame();
   }
}

document.onkeyup = checkLift;
function checkLift(e)
{
   if (
         (e.keyCode === 37 && changeInCarPos < 0) ||
         (e.keyCode === 39 && changeInCarPos > 0)
      ) 
         changeInCarPos = 0;
}

The creation of this game was in an effort to teach the students about the gaming loop. Some of the notes I gave the students appear below.

The Gaming Loop

All games follow the same basic loop.

while(gameIsRunning)
{
	getInputs();	// controls, network, ...
	updateState();	// time, physics, collision detection
	renderFrame();	// display the new animation frame
}

Three steps involved in updateState() are usually:

  1. Calculate how much time has passed (on the wall clock) since the last frame (iteration).
  2. Create any new objects (a bullet after a trigger press for example) and calculate the new positions of all objects according to the established physics and the time calculated in step 1.
  3. Calculate collision detection (bullets striking targets for example), delete objects no longer needed, and update statistics.

Clone Using Windows Complete PC Backup

Recently the hard drive on which I had Vista installed began to behave erratically. But I wasn’t worried as I had been using Vista’s “Complete PC Backup”! What could possibly go wrong? However, try as I might, and I tried a lot, I wasn’t able to get the recovery to work. It always gave the same error message, “There are too few disks on this computer or one or more of the disks is too small.”

My trouble was caused by the fact that I wanted to replace my drive. The “Complete PC Recovery” works if all you want to do is to rollback to an earlier backup. It seems that Vista’s “Complete PC Backup” is not designed to help if your hard drive dies.

Dialogue box showing Windows Vista Complete PC Backup
Perhaps the use of the word “complete” here is a little too strong.

I cobbled together this fix after reading a thread in the Microsoft Technet Forum.

  1. Boot from the install DVD, click “Next”, “Repair…”, and then “Next”.
  2. You should be at a dialogue box titled “System Recovery Options”, select “Command Prompt” (ignore “Windows Complete PC Restore”).
  3. Use the command diskpart to setup your new drive.
    The use of diskpart is well documented in the forum thread mentioned above, or at many other places on the Web. If your target drive is not already formatted, then you’ll have to use diskpart to do that. The commands you’ll need to issue will most likely be different for your setup, but it basically goes something like this: list disk, select disk 0, clean, create partition primary, list partition, select partition 0, format quick.
    Now, I’m not sure if the following was necessary, and it’s something you may also want to do even if your drive is already formatted. I issued the command assign letter c whilst I had the new volume selected. In any case you’ll need to know the drive letter of your target volume.
    Once you’re finished, type exit to leave diskpart.
  4. Now, issue the command:
    wbadmin get versions -backupTarget:e:
    …substituting the drive letter of your backup drive, and copy the latest version string returned.
  5. Next, issue the command:
    wbadmin start recovery-version:12/23/2008-16:39-itemtype:volume-items:c:-backuptarget:e:-recoverytarget:c:
    …substituting the necessary drive letters and version string. (Thanks to AtomicInternet for the command.) This is where assigning the current drive letter of “c” to the target drive saves some confusion.
  6. Once it’s done return to the list of “System Recovery Options” and choose “Startup Repair”. This will rebuild the boot-sector of the recovered drive.

Notes:

  • If you are using this to move to a smaller drive, and still have the original volume available, you can dynamically shrink the partition from within Vista before running a backup. (You use “Computer Management” to do this.) This may be necessary even if you think the two drives are the same size (for example, not all 500GB drives are identical in size). If the drive sizes differ by only a byte, the restore will fail.
  • Contrary to the claims of others, it does not matter how your drives are interfaced for this method to work. It makes no difference if your drives are hooked up via USB, IDE or SATA. Even if one or both of your drives are moved from one interface to another between backup and restore, it will still work.
  • Contrary to the experience of others, I did not have to re-authenticate my OEM copy of Vista. (In fact I’ve changed my CPU, RAM, video card, sound card and optical drive, all in addition to my hard drive, and I haven’t had to re-authenticate.)

SETI@home: Linux vs Windows – 3.03 vs 3.08

Abstract

What follows are the results from an experiment I conducted over several days during April of 2004 to determine which of four SETI@home clients was the fastest at processing work-units. The results should be considered as weak due to the large number of variables, the small sample taken and the limited scope of the experiment. The four clients, ordered fastest to slowest as I found them, are:

setiathome-3.03.i386-winnt-cmdline.exe
setiathome-3.08.i386-winnt-cmdline.exe
setiathome-3.03.i686-pc-linux-gnu-gnulibc2.1.tar
setiathome-3.08.i686-pc-linux-gnu.tar

Also, under typical workstation installations, I found a significant amount of variation in the time taken for the same client to process the same work-unit. This implies that there is significant room for optimisation in the case of a dedicated SETI@home computer.

Review

A search of the Web revealed two major lines of thought.

  1. The Linux client is slower except when processing VLAR units, and since these units occur infrequently, the Windows client is generally faster. (This assertion was often made with no reference to the version number.)
  2. Version 3.03 is faster than 3.08. (This assertion was often made without reference to the platform.)

What I did not find was evidence that tied these two assertions together. Hence my motivation for this experiment.

Aim

I wanted to find which of the clients was generally the fastest at processing units.

Design

The main difficulty in this experiment is that every work unit is unique and hence requires a different amount of processing time. The best practice in this case would be to run each client a large number of times and find the mean time taken. However each work unit takes several hours to complete and time was limited so I needed another approach.

For each run I decided to use the work-unit contained within amdmb-bench.zip that I obtained from seti.amdmbpond.com. It is described as a typical work-unit and is widely used as a benchmarking tool. This unit is not a VLAR (very low angle range) unit. VLAR’s generally take longer to process, and my reading suggests that the Linux clients are faster at processing these types of work-units. Roberto Virga, the author of KSetiSpy, asserts:

“On average, the performance of the two clients [is] the same, since any advantage cumulated by the Windows client is lost at the first VLAR it gets.”

Note that Roberto is not only saying that the Linux clients are faster at processing VLAR’s (a view which is widely accepted) but that there is no overall speed advantage in choosing one client over the other (a view not so not so widely accepted probably due to the large number of Windows users and their bias) implying that the Windows clients are exceptionally slow at processing VLAR’s. To verify this without executing a large number of runs would require a typical VLAR work-unit. Searching the Web I was unable to find such a unit. I decided to leave the testing of this assertion to a later experiment. This would give me time to perhaps collect my own VLAR units. Whilst this omission weakens the result of this experiment, I think that it is acceptable given the infrequency of VLAR’s and the significant differences in processing times I discovered whilst using the amdmb work-unit described above.

The operating systems were chosen and setup to represent typical situations: a “Workstation” install of Red Hat 9, and Windows XP Professional SP-1. Both systems were fully patched using up2date and Windows Update. Windows XP was running McAfee Virus Scan and SetiSpy. Red hat 9 was logged into KDE and was running KSetiSpy. Both operating systems were not used for any other tasks during the testing. Both were installed on the following machine.

 ●  AMD Athlon XP 1600+ (133MHz x 10.5 = 1.4GHz | 256kB L2 cache)
 ●  512MB SDRAM @ 133MHz
 ●  Asus A7V133-VM Motherboard (VIA KT133A Chipset)

At the time of the experiment there was also a second Windows XP Professional computer available. This computer was also running McAfee Virus Scan and SetiSpy. I decided to process as many work-units as possible using the two Windows clients in an effort to determine the mean processing time for each client. Whilst a couple of days was not enough time to get a representative mean, it would at least yield a clue as to which was the fastest client. The second computer was as follows.

 ●  AMD Athlon XP 2000+ (133MHz x 12.5 = 1.67GHz | 256kB L2 cache)
 ●  Kingmax 512MB DDR SDRAM @ 166MHz (Set to ‘Turbo’!)
 ●  EPoX 8K3A+ Motherboard (VIA KT333 Chipset)

Results

The times presented in the table below are in hours:minutes:seconds format.

v3.08v3.03
Win XP Pro5:25:42
5:16:46
5:14:35
4:52:32
Red Hat 95:58:03
5:44:49
5:19:26
5:29:02
Table 1: Time taken for clients to process amdmb work-unit (Athlon XP 1600+)

The times presented in the following table are in hours and the angle range (AR) is in degrees.

Windows XP Pro
v3.08v3.03
ARTimeARTime
1.9022.8440.9273.077
1.0613.2780.7023.230
0.4283.5850.4353.239
0.6143.5410.6523.233
0.6643.3460.7263.208
0.4283.5840.6133.276
0.4263.6120.7933.295
6.5212.8520.4293.248
1.2192.9000.4273.253
0.7033.4580.6653.148
0.4273.5890.0083.607
Table 2: Time taken for Windows clients to process real work-units (Athlon XP 2000+)

Calculations & Discussion

For the next table the times are in hours:minutes:seconds format, and the percentage given in each case is the difference expressed as a percentage of the smaller amount.

v3.08v3.03
Win XP ProMean:  5:21:14       
Range: 0:08:56 (2.8%)
Mean:  5:03:34       
Range: 0:22:08 (7.4%)
Red Hat 9Mean:  5:51:26       
Range: 0:13:14 (3.8%)
Mean:  5:24:14       
Range: 0:09:36 (3.0%)
Table 3: Means and ranges for clients to process amdmb work-unit (Athlon XP 1600+)

The results agree with my reading from the web. Note that the Windows 3.08 client is faster than the Linux 3.03 client for this particular work unit. Of greatest surprise is the significant variation in the time taken for the same client to process the same work-unit. I have tried to test the clients under normal “workstation” conditions. The larger than expected range implies that there is significant room for optimisation in the case of a dedicated SETI@home computer.

Percentage Differences in Time of the Clients
(vertical faster than horizontal)
Lin 3.08Lin 3.03Win 3.08Win 3.03
Lin 3.08–8.5%–9.4%–15.8%
Lin 3.038.5%–0.8%–6.7%
Win 3.089.4%0.8%–5.8%
Win 3.0315.8%6.7%5.8%
Table 4: Percentage differences in processing times for amdmb work-unit (Athlon XP 1600+)

From the above you can see that there is significant differences between the speeds of the various clients when processing the same work-unit.

The times presented in the following table are in hours and the angle range (AR) is in degrees.

Windows XP Pro
v3.08v3.03
ARTimeARTime
1.3083.3260.5803.256
Table 5: Average AR’s and times for Windows clients to process real work-units (Athlon XP 2000+)

The results for the second part of the experiment (table 2) reveal an obvious correlation between AR and processing time. The table above shows that even when the 3.03 client is processing units of lower AR that it outperforms the 3.08 client.

Note that the last unit processed by the 3.03 client was a VLAR (AR = 0.008). Taking this unit from the data set and calculating the extra time taken as a percentage of the new average gives 12%. The results from the first part of the experiment suggest that the Windows 3.03 client is 6.7% faster than the Linux 3.03 client. Therefore if the means are representative, then for the claim as made by Roberto Virga above to be true, roughly every third work-unit would need to be a VLAR. This is clearly not the case. Of the 22 results listed only 1 was a VLAR.

Conclusion

The fastest client of the four tested is setiathome-3.03.i386-winnt-cmdline.exe.

Future

  1. I wasn’t expecting the variation shown by each of the clients when processing the same work-unit. A greater number of trials are needed using the work-unit from seti.amdmbpond.com.
  2. A typical VLAR work-unit needs to be found to further test and compare the performance of all four of the clients.
  3. A greater number of real trials should be conducted using all four of the clients to better ascertain real-world averages.

Author

My name is David Johnston. You can contact me by clicking here.